
Get ready to wow your friends and family with an amazing appetizer! If you’re a cheese lover like me, you’re in for a treat.
These Monster Cheese Bites are a delicious, easy-to-make snack that’s perfect for any gathering. 🧀🎉
Dive into this recipe and bring some cheesy goodness to the table.
To whip up these bites, you only need a few simple tools and ingredients.
I’ve found that using fresh, quality cheese really makes a difference.
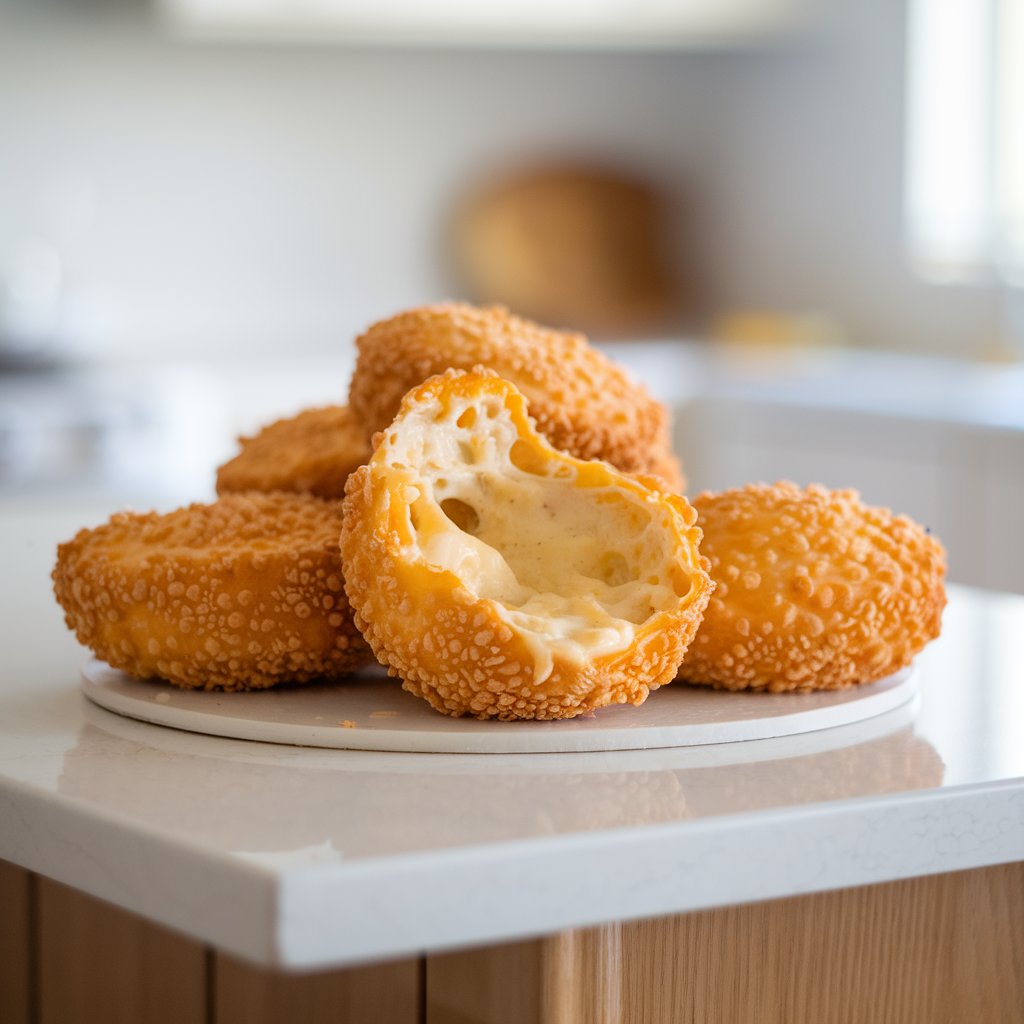
The first bite is always the best, bursting with flavor.
Trust me, everyone will be reaching for seconds! 😋👐
Let’s get started with what you’ll need:

Monster Cheese Bites Appetizer Recipe
Equipment
- To make these cheese bites, you’ll need a few basic tools.
- Mixing bowls: One large for mixing ingredients.
- Baking sheet: For cooking the bites in the oven.
- Parchment paper: Optional, but helps with easy cleanup.
- Cheese grater: To grate the cheese.
- Measuring Cups and Spoons: For accuracy in ingredients.
- Oven mitts: To protect your hands from the hot baking sheet.
- Make sure to have all these ready before starting, so you can whip up the bites without any interruptions. 🎉
Ingredients
Gather these tasty ingredients to make your monster cheese bites:
- 1 cup of grated cheddar cheese: Adds a sharp flavor.
- 1 cup of grated mozzarella cheese: For that gooey texture.
- 1 egg: Helps bind everything together.
- 1 tbsp of flour: Adds some structure.
- 1/2 tsp of garlic powder: Adds a hint of garlic flavor.
- Pinch of salt and pepper: To taste.
- Optional: Chopped parsley: For garnish and color.
With these ingredients, you’re all set to create something delicious! 😋
Instructions
Follow these simple steps to make your own cheese bites:
- Preheat the oven to 375°F (190°C).
- Mix all ingredients (except parsley) in a large bowl until well combined.
- Scoop tablespoon-sized portions onto the baking sheet lined with parchment.
- Bake the bites for 10–12 minutes, or until golden brown.
- Cool slightly before serving, and sprinkle with parsley if desired.
Keep an eye on them while they bake, and you’ll have a delicious snack in no time! 🎊
Notes
Presentation & Serving
Presenting Monster Cheese Bites can be a lot of fun! 🎉
I love using a platter with some vibrant colors to make the bites stand out.
Arrange them in neat rows to make them easy to grab.
Add some fresh green herbs like parsley or basil for an added pop of color.
To keep them warm for longer, I sometimes like to use a warming tray. It helps maintain their gooey goodness.
For a party atmosphere, use toothpicks with cute flags or in fun shapes. It makes snacking easy and keeps fingers clean! 😊
For serving, I suggest:
- A platter or serving tray
- Small plates for each guest
- Cocktail napkins
If there’s a dipping sauce as an accompaniment, place it in a small bowl on the platter. Use contrasting plates to really make the cheese bites pop! 🍽️
Here’s a simple list to make presentation shine:
- Add some fresh herbs or lettuce leaves around for decoration.
- Use a colorful bowl for any dipping sauce.
- Include a small sign or tag with the name of the dish.
It’s amazing how the right setup can make these bites even more tempting!
Storage Tips
After making those tasty Monster Cheese Bites, it’s important to store them right! Keeping them fresh ensures every bite is just as amazing as the first. 😊
Refrigeration:
I make sure to cool them completely after baking. Then, I place them in an airtight container. They’ll stay fresh for about 3-4 days in the fridge.
Freezing:
If I want to enjoy them later, I freeze them!
I arrange the bites in a single layer on a baking sheet and freeze until solid.
Tip: Use a freezer-safe bag to store them afterward. They’ll last up to 2 months in the freezer.
Reheating:
For a quick snack, I reheat them straight from the fridge or freezer.
In the oven, I bake them at 350°F (175°C) for about 10 minutes. From frozen, they might need an extra 5 minutes.
So simple and delicious! Have fun enjoying these cheesy bites long after they’ve been made! 🧀💥
Recipe Variation
I love trying new ways to make Monster Cheese Bites extra fun and tasty! Here are some ideas to mix things up and surprise everyone. 🎉
Equipment
- Mixing bowl
- Baking sheet
- Parchment paper
- Oven
Ingredients Variations
- Different Cheeses: Swap the usual cheese with pepper jack or mozzarella for a new flavor twist.
- Spices: Add paprika or garlic powder to give a kick of flavor! 🌶️
- Coating: Use panko crumbs instead of regular breadcrumbs for a crispy texture.
Instructions Variations
- Cheese Mix: Combine two kinds of cheese inside each bite for a cheesy surprise. 😋
- Shape: Try making them into mini balls or sticks for a fun change.
- Dip: Serve with different sauces, like ranch or spicy marinara for extra flavor options.
I hope you have fun and enjoy experimenting with these ideas! 🤗
Pairing
I’m so excited to share my favorite ways to pair Monster Cheese Bites! These cheesy treats are super versatile and can go with so many delicious options. Let’s make every bite count! 🍴🧀
With Drinks:
- Wine: A chilled glass of white wine works perfectly. Sauvignon Blanc or Chardonnay are great picks. 🍷
- Beer: Light beers like a refreshing pilsner complement the cheese nicely. 🍺
- Mocktails: Try pairing with a fruity mocktail for those who prefer non-alcoholic options.
Dips and Sauces:
- Marinara Sauce: The classic choice for a zesty twist.
- Ranch Dressing: Creamy and cool, it’s always a winner.
- Honey Mustard: Sweet and tangy for a fun flavor kick.
Snack Combos:
- Veggie Sticks: Add crunch with carrots and celery.
- Crackers and Nut Mix: A little salty, a little crunchy!
- Fruit Slices: Grapes or apple slices give a refreshing bite. 🍏🍇
I can’t wait for you to try these pairings with the Monster Cheese Bites! It’s always fun to mix and match, so feel free to experiment with your own favorite snacks and drinks. Enjoy! 🎉
Tips & Tricks
Let’s have some fun making these Monster Cheese Bites! 🎉 Here are my best tips to make them amazing:
Equipment:
- Baking sheet
- Parchment paper
- Mixing bowl
Ingredients:
- Make sure to use fresh cheese.
- Try different types, like cheddar or mozzarella.
Instructions:
- Freeze the cheese for a few minutes before baking. This helps them stay in shape.
- Use parchment paper to prevent sticking.
- Preheat the oven properly for even cooking.
More Tips:
- Want a crunchy coating? Use crushed crackers or breadcrumbs.
- Add some spices for extra flavor. A little garlic powder or paprika goes a long way! 🌶️
Cooking Time:
- Keep an eye on the oven. Cheese melts fast, so don’t wander off!
- I find 10 minutes to be just right!
If you love some spice, a side of spicy marinara works perfectly. 🧀
I always keep a little dipping sauce nearby. It adds kick and complements the cheese.
Enjoy making and sharing these cheesy bites! 🎈 Happy snacking!

Frequently Asked Questions
I’m thrilled to share the secrets for making monster cheese bites that will delight your guests and add excitement to your party!
These questions cover tips for creating spooky bites, choosing the best ingredients, and more.
What’s the simplest way to make monster cheese bites that will wow my guests?
To make monster cheese bites, I grab some crescent dough and cheddar cheese.
I cut the dough into small squares, place a cheese cube in the middle, and wrap it up. Adding candied eyes on top makes them extra fun! Bake until golden.
Which ingredients do I need to create the most delicious monster cheese bite appetizers?
- Crescent dough: This is the key for a soft, flaky bite.
- Cheddar cheese cubes: The gooey cheesy center!
- Candied eyes: For that monster look.
- Optional toppings: Garlic butter or herbs.
Can I find a crowd-pleasing monster cheese bites recipe that’s perfect for a Halloween party?
Absolutely! Monster cheese bites are always a hit at Halloween parties.
The playful look with spooky eyes and their cheesy goodness make them irresistible. Plus, using bright-orange cheddar adds to the festive look!
How can I put a spooky twist on cheese bites for a kid-friendly Halloween event?
I use cheese with fun colors like orange or green.
Adding bits of bell pepper or olive slices makes the bites look like little monsters. Kids love finding a surprise inside!
What are some tips for making sure my monster cheese bites are the hit of the party?
- Make extra: They disappear fast!
- Serve warm for the best melty cheese.
- Use variety with different cheeses and toppings to keep it exciting.
Is there a vegetarian alternative that will still keep the monster cheese bites appetizing?
Of course! I switch the cheese to a plant-based alternative and follow the same steps.
You can also add some vegan-friendly pesto or tapenade before baking for extra flavor.
Recent Posts
15 Non-Alcoholic Halloween Punch Recipes: Spooktacular Sips for Your Party!
Halloween is coming, and I'm all about making the party extra fun and festive! 🎃 Nothing sets the mood better than a delicious punch that everyone can enjoy. These non-alcoholic options are...
15 Easy Halloween Bread Recipes You’ll Want to Bake Right Now!
Halloween is one of my favorite times to bake! 🎃 It’s the perfect excuse to try some fun and spooky bread recipes. Each loaf adds a touch of festivity to your table and fills the house...