

Have you ever craved a dessert that’s as stunning as it is delicious? I recently stumbled upon a recipe that will make your taste buds tingle with joy.
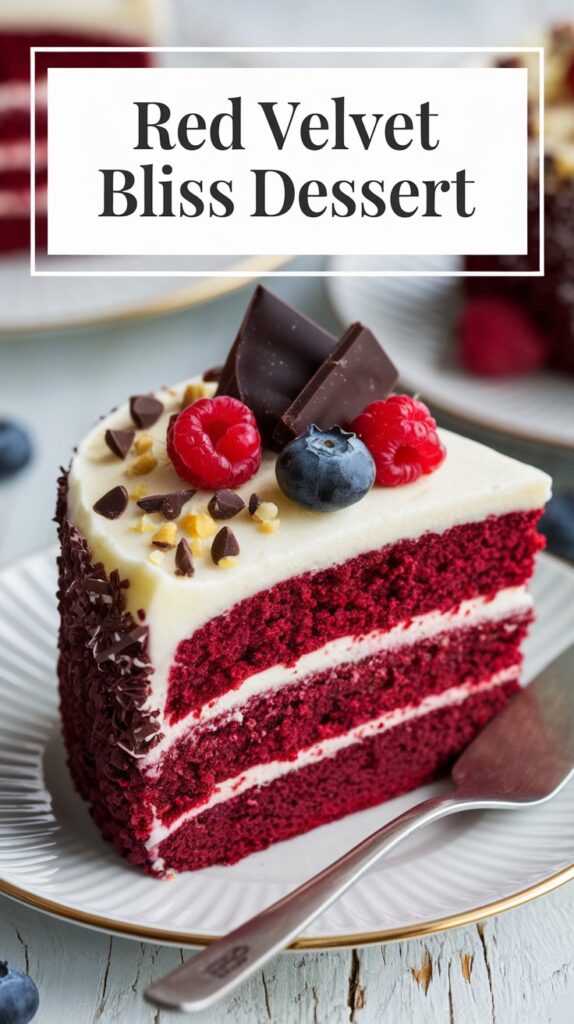
Red Velvet Bliss is not only a treat for the eyes but a heavenly delight for your mouth.
It’s a perfect mix of rich cocoa flavor and creamy goodness that you can whip up at home anytime. 🎂
I knew I had to share this gem with others who love baking something a little extra special.
Whether you want to impress guests at a dinner party or enjoy a cozy treat with family, this recipe hits the sweet spot every time!
The vibrant red color adds a festive touch, making it a great choice for celebrations. 🎉
Get ready to create your own piece of dessert magic. Here’s what you need to get started:

Red Velvet Bliss Dessert Recipe
Equipment
- Mixing bowls: Several sizes
- Electric mixer: For ease
- Baking dish (9×13 inch): Essential for even baking
- Rubber spatula: To scrape the batter
- Oven mitts: Safety first!
- Measuring cups and spoons: Accuracy matters
- Wire rack for cooling
- Having your tools ready makes the process smooth and fun. A well-equipped kitchen is the first step to dessert perfection!
Ingredients
- 1 box red velvet cake mix: Main ingredient
- 1 package cream cheese 8 oz, softened: Creamy texture
- 1/2 cup sugar: Sweetness 💖
- 1 cup whipping cream: Light and fluffy
- 1 teaspoon vanilla extract: Adds flavor
- Butter for greasing: To prevent sticking
- Optional toppings: Berries chocolate shavings, or nuts
These ingredients create a delicious harmony of flavors. Get high-quality ones to enhance the taste.
Instructions
- Preheat oven to 350°F (175°C): It’s go time!
- Prepare cake mix as per box directions: Follow precisely
- Pour into a greased baking dish: Spread evenly
- Bake for 25-30 minutes: Use timer for precision ⏲️
- Cool on a wire rack: Wait until it’s fully cooled
- Beat cream cheese and sugar until smooth: Creamy mix is key
- Add vanilla and whipping cream, beat until thick: Fluffy topping
Excited to savour? I can’t wait for these flavors to come together.
Notes
Feel free to be creative with toppings: Personalize your dessert
Store leftovers in refrigerator: Keeps it fresh
Check for doneness with a toothpick: Ensures perfect lightness and fluffiness
These tips will elevate your dessert experience, making it even more delightful! Enjoy every bite of this delicious creation! 😋
Presentation & Serving
I’m so excited to share how to present and serve the Red Velvet Bliss Dessert! 🥳
For that special touch, I like to add some decorations and use a nice plate or dish.
Equipment
- Dessert plates or small bowls
- Serving spatula
- Decorative napkins
Ingredients for Garnish
- Fresh berries (strawberries, raspberries)
- Mint leaves
- Powdered sugar
To impress my guests, I always start with a sprinkle of powdered sugar over the dessert. It looks like a light dusting of snow!
Then, I add a few fresh berries on top for a pop of color and freshness. 🍓
Lastly, I use a couple of mint leaves for a refreshing touch. They not only look great but also add a subtle aroma.
I serve the dessert on pretty plates with decorative napkins for a festive feel.
Each slice should be placed carefully with a spatula to keep it intact. Sometimes, I add a dollop of whipped cream on the side too. It’s optional but adds creaminess!
This simple presentation makes the Red Velvet Bliss Dessert the star at any gathering. Enjoy and share the yummy joy! 🎉
Storage Tips
After making my Red Velvet Bliss Dessert, I want to keep it fresh and tasty. Here are my tips for storing it. 😊
Refrigerator:
- Store: I put the dessert in an airtight container.
- Shelf Life: It stays fresh for up to 5 days.
- Note: I let it sit at room temp for 15 minutes before serving for the best texture.
Freezer:
- Wrap Well: I wrap each piece in plastic wrap and then foil.
- Airtight Bags: I place everything in a freezer-safe bag to avoid freezer burn.
- Shelf Life: This way, it lasts up to 2 months.
Thawing:
- Refrigerator Method: I move it from the freezer to the fridge and let it thaw overnight.
- Quick Serve: If in a rush, I let it sit at room temp for about an hour.
I hope you enjoy the dessert as long as possible with these tips! 🥳
Recipe Variation
Let’s have fun and add some twists to the Red Velvet Bliss Dessert! 🎉
First, I like to switch up the frosting. Instead of cream cheese, I sometimes use a fluffy whipped cream topping for a lighter feel.
Equipment:
- Mixer
- Baking pan
- Spatula
Ingredients:
- Fruit additions: Try adding berries or mango chunks.
- Nuts: Add a handful of crushed walnuts or pecans for crunch.
- Flavor twist: Use almond or orange extract instead of vanilla.
Instructions:
- Preheat the oven to 350°F (175°C).
- Mix in the fruit or nuts to the batter gently.
- Bake as usual, but keep an eye on it since fruit adds moisture.
Experimenting is the best part of baking! 🍰
Pairing
I love pairing my Red Velvet Bliss Dessert with some delicious options that really bring out its flavors. 😋 Here are some of my favorites:
- Beverages
A glass of cold milk is perfect. It balances the sweetness.
Coffee or a light green tea can be great too, adding a nice contrast. - Fruits
Fresh berries like strawberries or raspberries add a tasty twist.
A few slices of peach or mango can also make a colorful addition. - Ice Cream 🍦
A scoop of vanilla or chocolate ice cream is always a hit with this dessert. - Whipped Cream
Light and airy whipped cream adds a smooth texture that complements the cake. - Nuts
A sprinkle of chopped almonds or pecans can give it a nice crunch.
These tasty pairings make every bite even more fun and yummy! Enjoy your dessert with these little extras for an amazing treat. 🍰
Tips & Tricks
I have some amazing tips for making the perfect Red Velvet Bliss dessert! 🎂✨ These little tricks will make your dessert even more delicious.
Equipment Needed:
- Mixer: For smooth batter
- Oven: Preheat it properly
- Cooling Rack: Helps cakes cool evenly
Ingredients Tips:
- Buttermilk: Keeps it moist
- Cocoa Powder: Use just a bit for color
- Vanilla Extract: Adds deep flavor
Instructions Hacks:
- Room Temperature Ingredients: Always use these for better mixing.
Make sure to not overmix the batter. Just mix until everything is combined. Overmixing can make the cake dense, not fluffy.
When it comes to coloring, I prefer gel food color. It’s more vibrant and needs less quantity. 🌈
Baking Tricks:
Check the cake with a toothpick. If it comes out clean, it’s done! Too much baking can dry it out.
Decoration Delight:
Use a piping bag to layer frosting neatly. It adds a fancy touch without much effort.
I love adding a few edible decorations like sprinkles or chocolate shavings to the top. It makes it look extra special and festive. 🎉
Hope these tips bring you lots of joy and yumminess!
Frequently Asked Questions
I’m thrilled to share tips on making Red Velvet desserts that will impress your taste buds.
From the perfect ice cream cake to the best bread pudding, these secrets will make you the star of any dessert table! 🍰🎉
How can I make the perfect Red Velvet Ice Cream Cake at home?
Creating this delicious dessert is easier than you think!
I start with crumbled red velvet cake as the base layer.
Then, I add creamy vanilla ice cream on top.
Equipment:
- Springform pan
- Mixing bowl
- Spatula
Ingredients:
- Red velvet cake
- Vanilla ice cream
- Whipped cream
Instructions:
- Crumble the cake and press it into the pan.
- Spread a layer of softened ice cream over the cake.
- Freeze until firm and top with whipped cream before serving.
What secret ingredient gives Red Velvet Bread Pudding its unique flavor?
The secret ingredient that gives this bread pudding its delightful taste is cream cheese!
Mixing it into the batter adds a tangy surprise that makes every bite amazing. 🧀💖
Why is vinegar an essential element in baking a moist Red Velvet Cake?
Vinegar is the key!
It reacts with the baking soda, helping the cake rise and stay fluffy and moist.
Plus, it enhances the cocoa flavor beautifully! 🍫✨
What distinguishes Red Velvet Cake’s texture from a classic chocolate cake?
Red Velvet Cake is known for its velvety texture.
Unlike a classic chocolate cake, it’s softer and more tender, thanks to the combination of buttermilk and vinegar.
Can you transform a cake mix into a scrumptious Red Velvet Bread Pudding?
Yes! Take leftover red velvet cake or use a cake mix.
Equipment:
- Baking dish
- Mixing bowl
- Whisk
Ingredients:
- Red velvet cake mix
- Eggs
- Heavy cream
Instructions:
- Tear the cake into pieces and place in a dish.
- Whisk eggs, cream, and any seasonings.
- Pour the mixture over the cake and bake until set.
What are the steps to making irresistible Red Velvet Ice Cream Sandwiches?
To make these, bake red velvet cookies and sandwich them with ice cream!
It’s a perfect homemade treat.
Equipment:
- Baking sheet
- Ice cream scoop
Ingredients:
- Red velvet cookie dough
- Ice cream
Instructions:
- Bake the cookies and allow them to cool completely.
- Scoop ice cream onto one cookie and top with another.
- Freeze the sandwiches until ready to enjoy. 🍦🍪
Recent Posts
15 Non-Alcoholic Halloween Punch Recipes: Spooktacular Sips for Your Party!
Halloween is coming, and I'm all about making the party extra fun and festive! 🎃 Nothing sets the mood better than a delicious punch that everyone can enjoy. These non-alcoholic options are...
15 Easy Halloween Bread Recipes You’ll Want to Bake Right Now!
Halloween is one of my favorite times to bake! 🎃 It’s the perfect excuse to try some fun and spooky bread recipes. Each loaf adds a touch of festivity to your table and fills the house...