
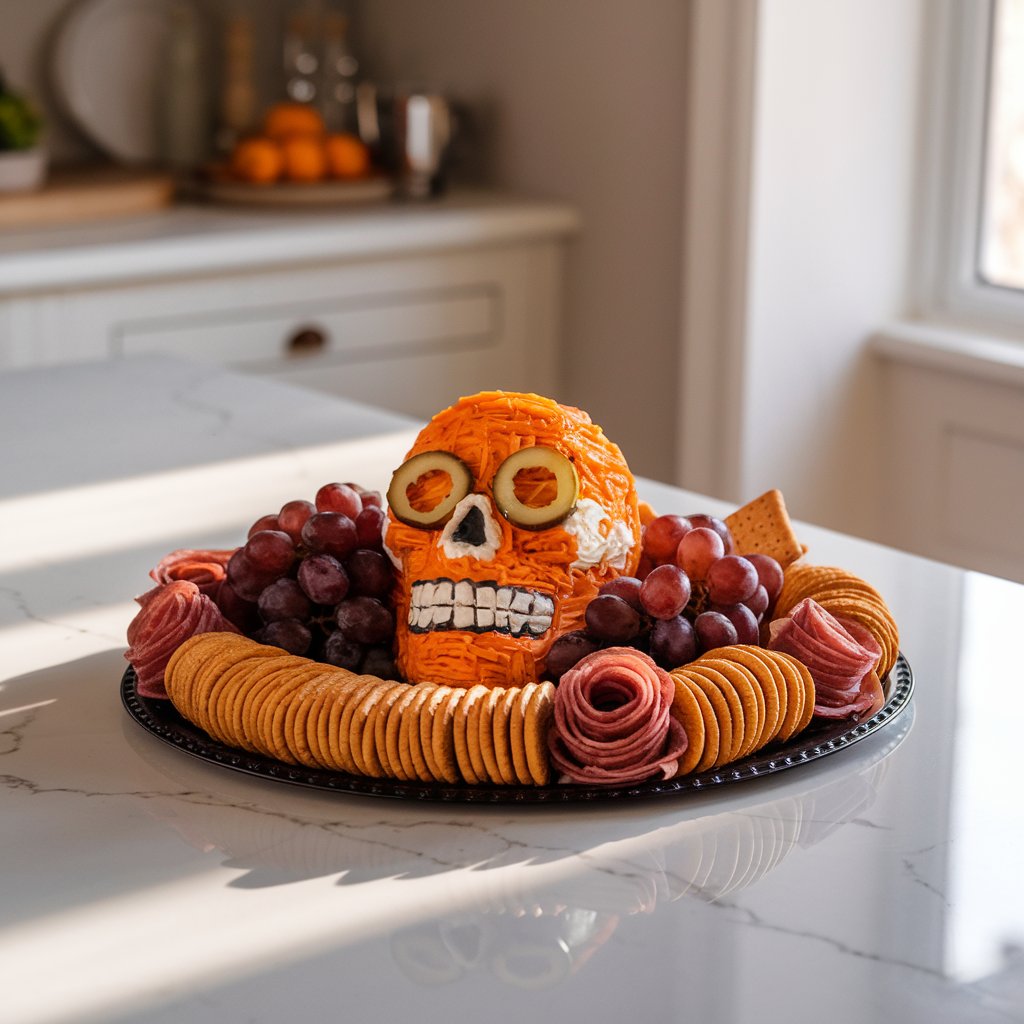
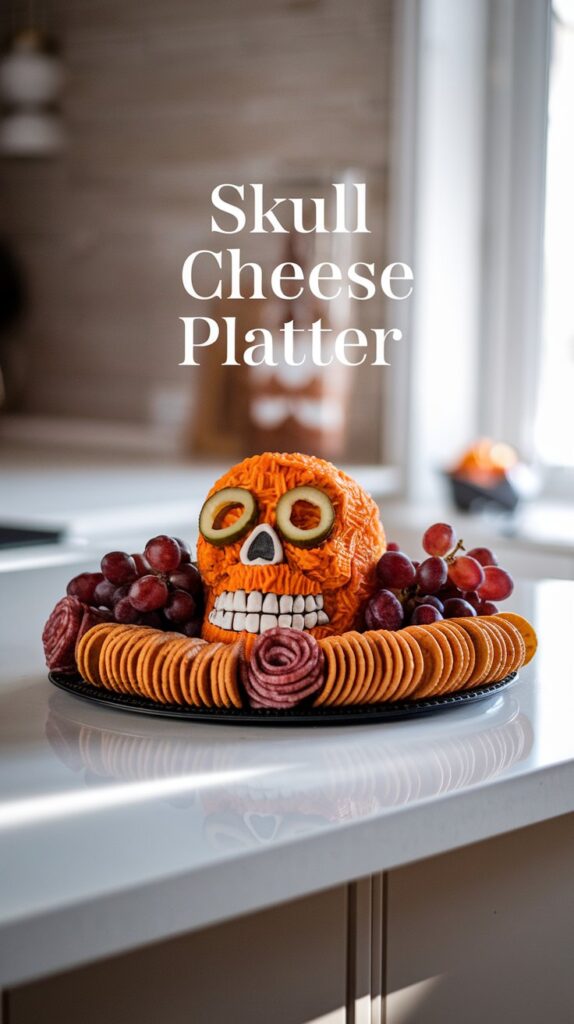
Get ready to impress your guests with a creative and fun appetizer: the Skull Cheese Platter! This dish is a perfect mix of spooky and delicious, making it ideal for Halloween or any themed party.
Not only does it look amazing, but it’s packed with your favorite cheeses and snacks. 🧀🎃
I love how easy this cheese platter is to prepare, and it’s always a crowd pleaser.
All you need are some simple ingredients and a few minutes to put it together.
Whether it’s a ghoulish get-together or just a cozy night in, this platter will be the star of the show.
If you’re looking to surprise your friends and family, this is the recipe for you.
It’s more than a platter; it’s an adventure on a plate.
Let’s dive into what you’ll need to create this eye-catching dish. 😍👻

Skull Cheese Platter Appetizer Recipe
Equipment
- Skull mold or skull-shaped serving dish
- Cheese grater
- Knife
- Serving platter or board
- Mixing bowl
- Spoons
- Cling film or plastic wrap
- Using a skull mold is key to creating the fun shape. I like to use a sturdy board to present the cheese platter.
- Don’t forget a mixing bowl and some utensils to get everything ready smoothly.
Ingredients
- Cheese selection: Cheddar Gouda, and Blue cheese
- Cream cheese 8 oz
- Sliced olives for eyes
- Grapes
- Crackers
- Almonds
- Salami slices
- I mix a variety of cheeses to add flavor and texture. Cream cheese helps everything bind together and fits the skull shape perfectly.
- Add a few extras like olives grapes, and almonds to decorate and add depth to the platter.
Instructions
- Prepare the mix: Grate cheddar and gouda, then combine with cream cheese in a bowl.
- Shape the skull: Press the cheese mix tightly into the skull mold.
- Chill the skull: Wrap it with cling film and chill for at least two hours.
- Unmold carefully and place it on the serving platter.
- Use sliced olives for eyes and position grapes, crackers, and salami slices around the platter for snacking.
Notes
Presentation & Serving
Let’s make this Skull Cheese Platter stand out! 🎃
First, I grab a large serving board. It helps keep everything neat and easy to reach.
For equipment and add-ons:
- Serving board
- Tiny bowls for dips
- Decorative knives
I place the skull in the center.
To make it spookier, I like using spider web napkins or even fake cobwebs around the edges. 🕸️
Fruits and veggies go best around the skull for color and freshness. Here are my favorites:
- Grapes 🍇
- Baby carrots 🥕
- Cherry tomatoes 🍅
- Apple slices 🍏
I sprinkle some crackers and nuts in between. It fills empty spaces and adds crunch.
For an extra kick, I use colorful dips and spreads like hummus or spicy salsa! 🌶️
When putting everything together, I try to mix colors and textures.
It’s like a yummy piece of art. 🌈
I keep extra napkins handy because the platter can get a bit messy, but that’s part of the fun! 🖐️
And remember, don’t forget to take lots of pictures before it’s all gone! 📸
Storage Tips
Want to keep your Skull Cheese Platter fresh and tasty? I’ve got you covered! 🧀💀 Here are my simple tips to help you store your creation perfectly.
Short-Term Storage
- Wrap tightly: Use plastic wrap or aluminum foil to cover the platter. Make sure no air gets in!
- Refrigerate: Pop it in the fridge. Keep it cool and ready to serve when guests arrive. 🥶
Long-Term Storage
If you need to store your platter for a few days:
- Separate ingredients: Store cheese and other toppings separately. It keeps everything fresh.
- Air-tight containers: Use these for each ingredient, so they stay yummy and crisp.
Extra Tips
- Rewrap! Once you’ve served, remember to wrap leftovers quickly.
- Label and date: It helps me remember how long it’s been in the fridge. 📅
Don’t let your delicious creation go to waste! Keep it fresh and delightful with these easy storage tips. Enjoy every bite! 🍽️
Recipe Variation
I love making the Skull Cheese Platter my own with a few fun twists! 🍽️ You can mix and match ingredients to suit your taste or the theme of your party. Here are some ideas:
Equipment:
- Cheese knives
- Skull-shaped mold
- Serving platter
Ingredients:
- Cheese Options:
- Sharp cheddar 🧀
- Creamy brie
- Spicy pepper jack
- Meat Options:
- Salami
- Prosciutto
- Fruit Options:
- Grapes 🍇
- Sliced apples 🍏
- Dried apricots
Instructions:
- Choose bold cheese flavors for a zesty experience!
- Mix different textures. Try soft and hard cheeses.
- Add sweet fruits for a tasty balance. 🍎
One of my favorite twists is using pepper jack cheese for a spicy kick!
If you prefer a more savory platter, use more meats and less fruit.
Adding some edible flowers can give a pop of color. 🌸
This makes the platter not only tasty but beautiful too!
Don’t forget to be creative with the arrangement.
I like making it look like a spooky skull. Have fun and make it your own! 🎉
Pairing
I love creating a delightful cheese platter for my guests. To make it extra special, choosing the right pairings is key! Here are my favorite ideas to complement the Skull Cheese Platter. 🧀
Perfect Wines 🍷
- Red Wine: Try a smooth Pinot Noir.
- White Wine: Sauvignon Blanc adds a fresh taste.
- Rosé Wine: Delicate and light, perfect for these cheeses.
Fruits & Nuts 🍇🥜
Adding fruits and nuts gives a sweet and crunchy balance.
- Fruits: Grapes, sliced apples, or figs work wonders.
- Nuts: Almonds or walnuts add a nice crunch.
Crackers & Breads 🍞
Different textures make the platter exciting.
- Crackers: Choose a mix of whole grain and sesame.
- Breads: A sourdough or baguette works great.
Dips & Spreads 🥣
I like putting out a few dips for added flavor.
- Hummus: Smooth and creamy.
- Honey: Sweet touch for cheese.
- Chutney: Try a spicy mango chutney.
Pairing the right extras with the cheese makes the platter a true treat.
I enjoy experimenting with different combinations to see what delights my guests the most. 🙌
Tips & Tricks
Creating a spooky skull cheese platter is super fun! 🎃 Here are some tips to make it amazing:
- Choose a variety of cheeses: A mix of soft, hard, and blue cheeses will keep it interesting. Cheddar, Brie, and Roquefort are great picks!
- Add some color: I love using fruits like grapes and figs. They make the platter pop. 🍇
- Use molds: A skull-shaped mold gives the cheese an eerie touch.🦴 It’s perfect for Halloween parties!
- Decorate with care: Edible flowers or herbs make the platter look fancy without a lot of fuss.
Feel free to get creative!
Stick to these tips and your platter will be the star of the party. 🤩
Instructions
- Set Up: Arrange cheeses in the skull-shaped mold.
- Decorate: Add fruits and flowers or herbs around the cheese.
- Display: Place on a platter and serve.
Have fun creating your spooky masterpiece! 🕸️🎃
Frequently Asked Questions
Get ready to impress your guests with a thrilling skull cheese platter. Below are some of my favorite tips and tricks to create a spooky and tasty treat for everyone to enjoy! 🎃🧀
How can I create a spooky skull-shaped cheese platter for my Halloween party?
To make a skull-shaped cheese platter, I use a skull mold. It’s easy to find online or at party stores.
Fill the mold with a mix of soft cheeses like cream cheese or goat cheese. Chill it until it’s firm, then pop it out for a spooky centerpiece!
What are the best cheeses to use for a macabre skeleton-themed charcuterie board?
For a creepy vibe, I choose cheeses with bold flavors and colors.
Try black waxed cheddar, blue cheese, and gouda. These cheeses not only taste great but also add a dark and eerie look to the board. Don’t forget some softer options like brie or camembert for contrast.
Can you share some exciting ideas for decorating a skull charcuterie board for a Halloween feast?
To make the board come alive, I use olives for “eyeballs” and roasted red peppers as “veins”. Add dried fruits and nuts for texture.
Scatter a few fig halves for an eerie effect. Make my guests shiver with this scary-good spread! 🎃👻
What’s the secret to assembling an easy yet creepy skeleton cheese and meat tray that’ll wow my guests?
Use pre-sliced cured meats like salami or prosciutto for easy layering. Drape them across the board to mimic a skeleton structure.
Fill in with cheese cubes or slices as “bones.” Add a few sprigs of rosemary for a touch of green eeriness.
How far in advance can I prepare my bone-chilling cheese platter without compromising its deliciousness?
I usually prepare my platter a few hours before the party.
Wrap it tightly in plastic wrap and store it in the fridge. This way, everything stays fresh and tasty. Just take it out about 30 minutes before serving to let the flavors shine.
What creative names can I give my meat and cheese tray to amp up the Halloween vibe?
Here are a few fun names I’ve come up with: “Gory Gouda Graveyard,” “Sinister Salami Skull,” or “Bone-Chilling Brie Board.”
Naming the tray adds more fun to the presentation and gets everyone in the Halloween mood! 🎉
Recent Posts
15 Non-Alcoholic Halloween Punch Recipes: Spooktacular Sips for Your Party!
Halloween is coming, and I'm all about making the party extra fun and festive! 🎃 Nothing sets the mood better than a delicious punch that everyone can enjoy. These non-alcoholic options are...
15 Easy Halloween Bread Recipes You’ll Want to Bake Right Now!
Halloween is one of my favorite times to bake! 🎃 It’s the perfect excuse to try some fun and spooky bread recipes. Each loaf adds a touch of festivity to your table and fills the house...